Ever wonder how you can turn all of those beach treasures you found on your last vacation into lasting memories? Wonder no more. This article will tell you how to incorporate your finds into Christmas crafts and decorations. Gather the family the make these crafts and plan your next OBX vacation together!!
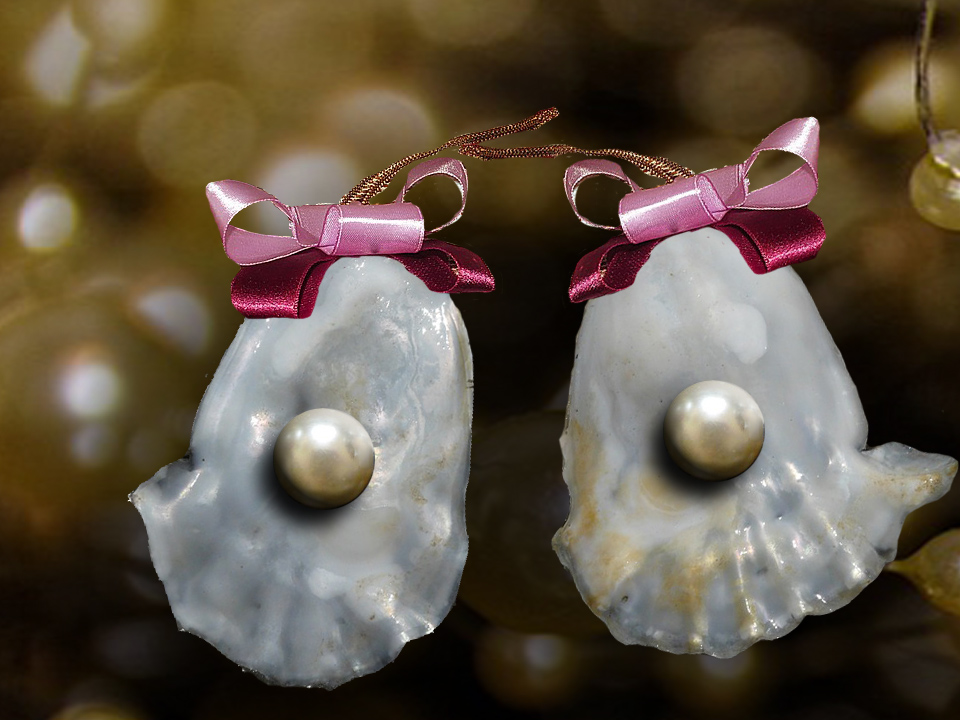
Pearled Oysters on the Half Shell
Oysters are famous for two things; pearls and being delicious. Though you may have already enjoyed the oyster and didn't find a pearl, here's a way to enjoy a 'pearled oyster' at Christmas. 
MATERIALS:
- Oyster shells
- Gold leaf (kit)
- Pearlescent acrylic craft paint (the kind with mica in it so it sparkles)
- A way to drill a hole in a shell
- Large fake pearl
- Aleene's Tacky Glue (or glue gun)
- Ribbon for hanging (your choice of colors)
Drill a hole in the top of the oyster shell. This is how your oyster will be hung. Paint the entire shell with 1-3 coats of pearlescent paint. Since craft paint is not as heavily pigmented as professional grade, the beauty of your inner oyster shell will shine through the paint.
Once paint is dry, apply gold leaf to the rim of the shell. Once dry, glue the pearl in the deepest part of the oyster. Once the entire oyster is dry, thread the ribbon through the hole at the top and tie a bow.
Ship's Wreath
If you want a nautical themed wreath this year, don't settle for gluing seashells to a regular run of the mill wreath. This year, a truly special wreath that calls to the sea, starts with the base.
MATERIALS
- Ships 'wheel' (you can buy them in stores around the Outer Banks or get a craft version online)
- Package of decorative Christmas lights with battery pack (available in craft stores)
- Snow spray in a can (they make it to simulate snow frosted windows)
- Pack of plastic snowflake ornaments
- Silver glitter spray (Rustolem makes a good one.)
- Aleene's Tacky Glue (or glue gun)
Give the wheel a complete first and second coat of silver spray paint. Once dry, spray the wheel with the canned snow. You're not worrying about complete coverage with this spray. In fact, you want it to be a little 'spotty' so the silver glitter will shine through.
Once dry, hide the battery pack behind the center part of the wheel. The main wire can 'hide' behind a spoke until it gets to the outer rim. Wrap your lights in a pleasing arrangement around the outer rim and spokes until it 'looks right.' Spot glue your lights and battery pack into place. Glue snowflakes to outer rim and spokes of wheel. Now you have a nautical wreath.
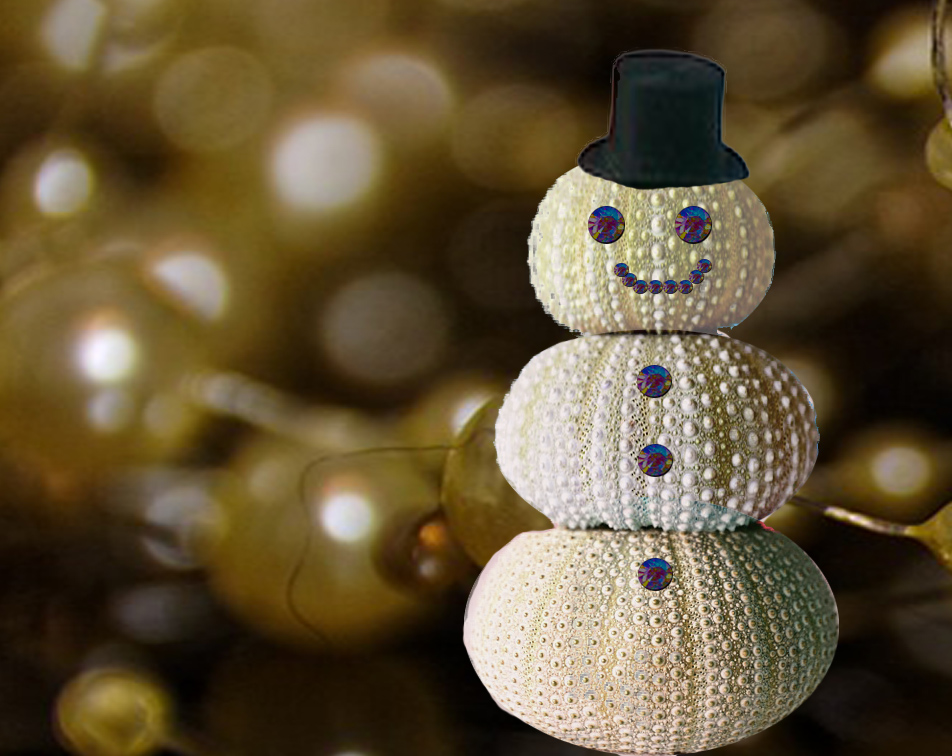
Sea Urchin Snowman
People often say 'urchin' like it's a bad thing. However, this season, urchins are the perfect thing for decorating your holiday home. And that's a good thing.
MATERIALS 
- 3 sea urchins; small, medium and large
- White paint
- Black rhinestones or sequins
- Length of decorative cord or ribbon
- Aleene's Tacky Glue (or glue gun)
- Craft top hat (optional)
Paint your 3 urchins white and let dry. You want them to be all white so you'll need many coats. Then, glue the urchins together; the smallest one on top and the largest one on the bottom. Attach sequin/rhinestones to be eyes, nose, mouth and buttons. Wrap the cord/ribbon around the 'neck' of the smallest urchin (where the small and the medium one join) Finish with a top hat, available in a craft or doll section.
Jeweled Seashells
Seashells are often called 'nature's Jewels'. So it's fitting for the holidays that fake jewels and the 'jewels of the sea' combine to make something truly breathtaking.
MATERIALS
- A variety of seashells
- An assortment of rhinestones, crystals, and beads
- Aleene's Tacky Glue (or glue gun)
- Ribbon for hanging (your choice of colors)
- A way to drill a hole in a shell
- Pearlescent acrylic craft paint (the kind with mica in it so it sparkles) Optional
If you'd like the seashell colors to be muted, first is to paint the shell with 1-2 coats of mica pearlescent craft paint. Or, you can skip this step entirely.
Drill holes in the top of shells for hanging. Decide where you want the rhinestones/crystals and glue them on. They look best in harmony with a shell's natural lines; along the rim or following lines up or down. Let dry, thread a ribbon through the hole, tie and hang.
Faux Sea Glass Christmas Balls
This is an unusual method I came across for making any glass object look like sea glass. It's not limited to Christmas balls. You can do it with glasses, plates and bottles too, as long as you remember they are neither food safe nor waterproof.
MATERIALS
- Clear Glass Christmas Ball Ornaments
- Elmer's Glue
- Food coloring
- Mixing palates, sticks and paint brushes (paper plates and fat toothpicks work just fine)
- Ribbon for hanging
Squeeze a big puddle of Elmer's glue onto a plate. Mix in drops of food dye until desired color is achieved. Paint the balls and let dry. The Elmer's will cause the food dye to dry to a finish that looks just like sea glass.
Sea Shell Tea Lights
Fire resistant, translucent and beautiful, Sea shells are the perfect holders for candles. And since it's candle season, here's how to turn your seashells into candles.
MATERIALS
- Scallop, whelk, or other shells with a definite impression in them
- Candle wax
- Candle wick
- Glass beads (no plastic)
- Aleene's Tacky Glue (a glue gun should never be used around candle crafts.)
- Scents and dyes (optional)
If your shell seems 'tippy,' add on beads to act as feet. This will stabilize the shell and prevent it from spilling out hot wax. Once the feet are dry, place the wick inside the shell as the included instructions show.
Melt the candle wax according to the instructions and add in whatever scents and dyes you like. Then, pour in the melted wax, being careful that the wick does not disappear in the wax. Let cool, then light and enjoy.
Sea Shell Soap Dish
Not just for Christmas, this soap dish can be used any time of year. It also makes a great present or wonderful guest bathroom accent.
MATERIALS
- Large Oyster or scallop shell (you need a shell with a shallow depression)
- Large beads
- Pearlescent acrylic craft paint (the kind with mica in it so it sparkles)
- Aleene's Tacky Glue (or glue gun)
Give your shell 1-2 coats of mica craft paint. This will help mute the colors and help it blend in better with your décor. Glue 3-4 beads to the bottom of the shell to prevent tipping. These will act as its feet. Let dry. Now, you have a soap dish.
Sparkling Beach Mason Jars
Mason jars aren't just for canning or catching fireflies anymore. They also make fun home décor accents. By combining seashells, lights and ornaments, you can make a truly dazzling display.
MATERIALS
- Mason jars
- Battery powered lights
- Small silver/blue/gold Christmas balls
- Sparkling beads
- Shells
Arrange the lights in the jar the way you want. Make sure that the battery pack is outside the jar so you can turn it on and off. (Depending on the fit of your jar lid, this may involve cutting out a tiny piece of side from the lid.)
Fill the jar with seashells, Christmas ornaments, and beads. Then close the jar and turn on the lights.
Seashell Toothpicks
What could be better than serving your holiday hors d'oeuvres with a combined beach and nautical theme? This is a great way to use your small shells.
MATERIALS
- At least 12 Shells smaller than a nickel
- A box of toothpicks
- Red or green beads/pearls
- E6000 Craft Adhesive
For this one you need a stronger bond than Aleene's provides
Glue the colored people to the top of each shell. Once dry, glue the shell to the top of a toothpick. These tiny skewers look great stick out of seafood based hors d'oeuvres (think shrimp)
Beach Snow Globe
Who says snow globes have to be filled with snow? How about one filled with sea shells and glitter instead? You won't believe how easy it is to get professional snow globe and a lot of fun for not a lot of money.
MATERIALS
- Snow globe kit (a flower 'aquarium' or a jar with a tight fitting lid you can glue will also work)
- 2 part water proof Epoxy for glass
- Glitter
- Sand
- Seashells
- Baby oil
Mix the epoxy with sand and spread along the bottom of your globe. You can have a thin layer or be creative with peaks and valleys. Let dry. Then glue your shells into place on sandy base. Let dry.
Fill the glass part of the base 2/3 full of baby oil. Baby oil does turn green the way water can and it makes the glitter fall slower. Add a 1-2 tablespoons of glitter depending on the globes size. (adding too much glitter will make it impossible to see your shells.)
Turn base over and epoxy it to the globe. One dry, your beach snow globe is ready to be shaken and enjoyed.
Just because the summer is over doesn't mean you have to give up all things beachy. By incorporating a beach theme into your holiday decorating, you can enjoy the beach all year long. And if you're giving a beach vacation for Christmas this year, don't forget to check out our Specials Page.
*As always, proper care is to be used around anything chemical, sharp, or hot. Atlantic Realty is not responsible for any damage of person or property related to these instructions. Slight risk is the nature of crafts.


